Consuming REST Api in Android using Retrofit

Introduction
In Android applications that have a server-side component, the communication between the client-side(Android) and Server-Side is usually enabled by a REST Api , using JSON as primary communication medium between them.
Retrofit
Retrofit is a type-safe library by Square, that makes the life easier by allowing a very elegant syntax and architecture for consuming REST Apis.
Components
- We will be using Retrofit 2 library by Square.
- For a dummy API server there is an awesome site that caters the purpose http://jsonplaceholder.typicode.com/;
Configuration
Lets add the dependency for Retrofit
    compile 'com.squareup.retrofit2:retrofit:2.0.0'
    compile 'com.squareup.retrofit2:converter-gson:2.0.0-beta4'
If you are using Proguard for builds add following to your proguard-rules.pro file. (It is better to add these rules to avoid proguard issues in release builds)
-dontwarn retrofit2.**
-keep class retrofit2.** { *; }
-keepattributes Signature
-keepattributes Exceptions
To allow application to access internet add the INTERNET permission in AndroidManifest.xml
<uses-permission android:name="android.permission.INTERNET"/>
Retrofit Overview.
Firstly, let us understand the basics of Retrofit and API Consumption.
- Retrofit Services are Java interfaces that act as Resource Controller interfaces, for e.g. we have an API for blog posts, we can have a PostsService class that will have all the CRUD methods for post’s api like:-
- createPost() for
POST /postrequest - deletePost() for
DELETE /post/idrequest - listPosts() for
GET /post
- createPost() for
- The methods in this Service class are declared but not defined (as you would do in a Java interface). Along with their declaration we would apply some annotations over the methods which would tell their:-
- Path URL (e.g. /posts )
- HTTP Verb (e.g. GET,POST,PUT,DELETE,HEAD etc.)
- Request Headers (if any)
- and some other advanced options, but to keep things simple, we would use just Path and Verb annotations
- Each request is wrapped as a
Call<T>class in Retrofit which acts like a callback, here T is the Response Class. - For asynchronous requests, we provide a
Callbackclass that has implementation for handling success and failure responses.
Let’s Code
Components
Firstly lets see what all are the classes , interfaces we will be creating and for what will they be needed.
- Post.java : This is our model (or POJO), the post object to contain the attributes of the post.
- PostService.java: The Retrofit interface that will be used to define API calls to our server, callbacks etc.
- MainActivity.java :- This is the default Android Activity that will be our launcher activity screen and show the fetched post data on the UI.
Post.java (Post Model)
If we hit the url http://jsonplaceholder.typicode.com/posts/1 which is a GET request to fetch post with id : 1 , it gives us following response:-
{
"userId": 1,
"id": 1,
"title": "sunt aut facere repellat provident occaecati excepturi optio reprehenderit",
"body": "quia et suscipit\nsuscipit recusandae consequuntur expedita et cum\nreprehenderit molestiae ut ut quas totam\nnostrum rerum est autem sunt rem eveniet architecto"
}
The above json needs to be converted into a Java Class to be used in our app. Though you can make it manually but just to do it efficiently in case we have very complex json structures , we can easily convert it into a Java POJO using this amazing tool http://jsonschema2pojo.org/
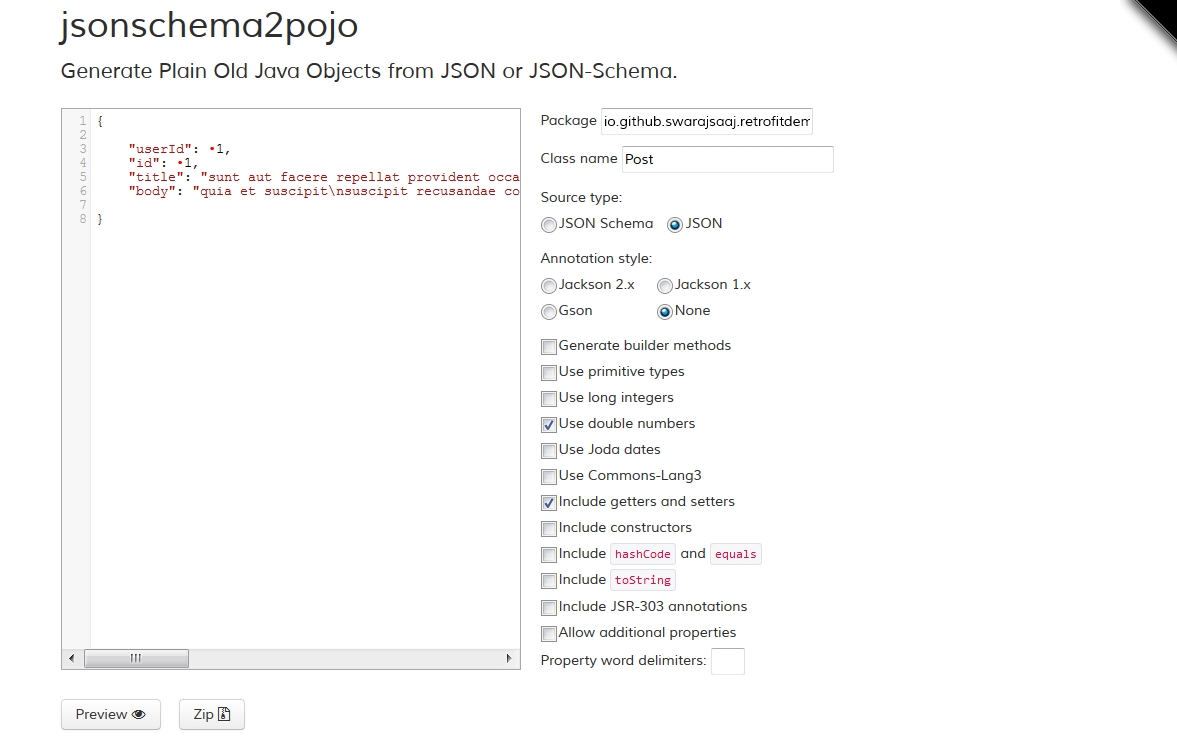
Just paste the json in left textarea, Fill in the package name and class along with settings as shown in the above screenshot, Just click preview to see how it looks in java or zip to download it.
After conversion we will have following Post.java
package io.github.swarajsaaj.retrofitdemo.models;

/**
 * Created by swarajpal on 31-03-2016.
 */
public class Post {

    private Integer userId;
    private Integer id;
    private String title;
    private String body;

    /**
     * @return The userId
     */
    public Integer getUserId() {
        return userId;
    }

    /**
     * @param userId The userId
     */
    public void setUserId(Integer userId) {
        this.userId = userId;
    }

    /**
     * @return The id
     */
    public Integer getId() {
        return id;
    }

    /**
     * @param id The id
     */
    public void setId(Integer id) {
        this.id = id;
    }

    /**
     * @return The title
     */
    public String getTitle() {
        return title;
    }

    /**
     * @param title The title
     */
    public void setTitle(String title) {
        this.title = title;
    }

    /**
     * @return The body
     */
    public String getBody() {
        return body;
    }

    /**
     * @param body The body
     */
    public void setBody(String body) {
        this.body = body;
    }

}
PostService.java
As explained in overview section above, this is an interface that defines the REST Api to be consumed,
To start with, we will create two methods in our Service:-
- getAllPosts() :- To list down all the posts.
- getPostById(int id) :- To get a single post.
The simple interface will look like:-
public interface PostService {

    @GET("/posts")
    Call<List<Post>> getAllPosts();

    @GET("/posts/{id}")
    Call<List<Post>> getPostById(@Path("id") int id);

}
Explanation :- The @GET annotation tells that this method is a GET request the argument in the method (“/posts”) is the trailing url of the request (i.e. except the base url of the host).
The return type Call<List<Post>> specifies the this is a call with return type as list of posts.
The another method is similar , but has a new @Path(“id”) annotation in its arguments which tells retrofit that current argument is to replaced in the url (/posts/{id}) with id, for example if id is 1 the url would become “posts/1”.
MainActivity.java
This activity is our driver, it will contain code for creating the service and consuming the results.
First we will create the ``` Retrofit `` class as follows:-
        Retrofit retrofit = new Retrofit.Builder()
                .baseUrl("http://jsonplaceholder.typicode.com/")
                .addConverterFactory(GsonConverterFactory.create())
                .build();
Here baseUrl() defines the base url of the host the converter factory defined here is GsonConverterFactory, which will be needed for converting the json response to java POJO class.
Lets make an instance of the service by calling create()
PostService postService = retrofit.create(PostService.class);
Now Insantiate a call by this service by invoking its method.
Call<List<Post>> getAllPostsCall = postService.getAllPosts();
To make this HTTP call, we have two options enqueue() (Asynchronous call) and execute() (Synchronous call).
Lets use asynchronous call enqueue():
 getAllPostsCall.enqueue(new Callback<List<Post>>() {
            @Override
            public void onResponse(Call<List<Post>> call, Response<List<Post>> response) {
                //Fetch the first post and display it on UI,
                displayPost(response.body().get(0));
            }

            @Override
            public void onFailure(Call<List<Post>> call, Throwable t) {
                //Log the error, or perform required action.
                Log.e(TAG, "Error occured while fetching post.");
            }
        });
Here the Callback<List<Posts>> interface is implemented as the argument of enqueue() method , as its asynchronous, the callback is executed when the HTTP response is received. It overrides two methods onResponse() and onFailure().
onResponse() is called in case the response code of HTTP call is a success code(like 200) , onFailure() is called when response is 500,403 etc.
In the end, implement the displayPost() method that just displays the post data on the ui.
    private void displayPost(Post post) {
        postId.setText(post.getId().toString());
        postTitle.setText(post.getTitle());
        postText.setText(post.getBody());
    }
Post request
Now, let us add a POST http call to our service.
Add another method declaration to our PostService.java interface.
 @POST("/posts")
    Call<Post> createPost(@Body Post post);
__Note : The POST here is POST http verb , different from our blog post resource being used for API requests. __
@POST annotation specifies that this a POST call.
**Call
To make this http call
  Post newPost = new Post();
        newPost.setId(100);
        newPost.setUserId(200);
        newPost.setTitle("Sample title");
        newPost.setBody("Sample data.");
  createPost(postService, newPost);
and createPost() as:-
    private void createPost(PostService postService, Post newPost) {

        Call<Post> call = postService.createPost(newPost);
        call.enqueue(new Callback<Post>() {
            @Override
            public void onResponse(Call<Post> call, Response<Post> response) {
                displayPost(response.body());
            }

            @Override
            public void onFailure(Call<Post> call, Throwable t) {
                Toast.makeText(getApplicationContext(), "Unable to create post" , Toast.LENGTH_LONG).show();
                Log.e(TAG,t.toString());
            }
        });
    }
Secured APIs may need to add a token in headers for security, we can have fixed as well as dynamic headers:-
- Fixed headers are added as annotation in service as follows:-
//For a single header
@Headers("Authorization: Basic f43awds1231fsd2dfg2ff3asddassdfsf")
@POST("/posts")
    Call<Post> createPost(@Body Post post);


//For multiple headers
@Headers({
    "Accept: application/json",
    "Authorization: Basic f43awds1231fsd2dfg2ff3asddassdfsf"
})
@POST("/posts")
    Call<Post> createPost(@Body Post post);
- Dynamic headers are added as arguments to methods that can be added each time the call in invoked.
@POST("/posts")
    Call<Post> createPost(@Header("Token") String token,
                          @Body Post post);
This was a simple post demostrating how to get started with Retrofit, and making GET,POST requests on a REST API. Hope you enjoyed making this example and will enjoy using Retrofit as well, and make API consumption a smooth experience.
Feel free to comment if you find this post useful or have any doubts or issues in setting this up.
Download Source Code
~swarajsaaj